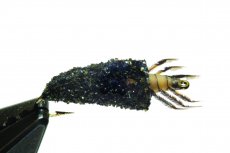
Cased Caddis pattern step by step instructions using Virtual Nymph fly tying materials.
MATERIALS USED
THREAD - Virtual Nymph Dyneema
HOOK - Mustad 80050 #10 - 12
LEGS - Golden Pheasant Centre Tail
CADDIS GRUB HEAD - Nymph Skin
PEN - Edding 142M Dark Brown & Kurecolour 420.
ABDOMEN - Round lead - Black yarn - Virtual Nymph Freestone Caddis Coating.
As you can imagine, these Cased Caddis patterns are quite heavy. Which is good because they are fast sinkers and start to fish immediately they reach the riverbed. There seems no sense in tying up lots of different variations, as you can imagine, all you have to do is vary the shape, size and material of the case for imitating the many different Caddis Species we find in our rivers.
Tying the Cased Caddis
STEP 1 - Tie on your thread behind the hook eye and wind for 6mm a bed of thread with touching turns. Tie in by the tip a 4 inch strip of 3 mm translucent Nymph Skin. Cut a strip of Self Adhesive lead sheet about 1.5 mm wide by 7 - 8 cm long. Wind on a layer.
STEP 2 - Wind a second and third layer tapering it back from the hook eye, building a neat taper. Dye the Nymph Skin with a Kurecolour 420. Or any colour to match the hatch.
STEP 3 - Wind the Nymph Skin forward making even segments to the eye of the hook.
STEP 4 - Dye your thread with an Edding 142M Dark Brown and build a small head. Now, half hitch the thread. Pluck a leg and wind the thread back up the grub head following the Nymph Skin segments. Pluck 6 legs and trap in as you wind the thread back up the grub head following the Nymph Skin segments. Snip off the waste ends. Half hitch your thread and snip off.
STEP 5 - Take a black pen lid and cut off the tip. This is for the opening of the Caddis case. You can use an inverted metal cone, but depending on the hook you use sometimes they will not slip round the hook gape.
STEP 6 - Push on the pen top, large aperture first and secure in position with a drop of super glue or epoxy. Tie on your thread and wind down to a position 1/3rd around the hook gape.
STEP 7 - Using round lead wire build a tapered lead under body over your bed of thread. Tie in a long length of any black multi-fibre yarn and leave your thread hanging at the back of the pen top.
STEP 8 - Wind on the black yarn covering the lead under body. Put some extra wraps into the lead steps. To secure the yarn, coat the layers with hard as nails glue. Once you have covered the lead under body and applied a final coat of glue, sprinkle Virtual Nymph Freestone Caddis Coating onto the glue. Rotate the case in the vice to give an even coating.
STEP 9 - You can push the coating with your finger to get an even cylinder. Job done....


